3D
增材制造(或称3D打印)是指通过数字文件制作3D实体物件的过程。利用工业机械臂配合RoboDK软件,可实现三轴或五轴3D打印。以下视频概述了如何通过RoboDK离线设置3D打印流程:观看Video。
机器人3D打印可通过以下方式之一实现:
●通过RoboDK直接将G代码程序(NC文件)转换为机器人程序,如机器加工项目所示。系统会精确计算每个运动中的材料流速(挤出机指令E),并可作为程序事件集成到生成的程序中。G代码是RoboDK支持的一种NC文件格式,也是许多3D打印机兼容的格式。大多数切片软件可根据STL文件生成G代码。
Note:切片软件负责将3D模型转换为机器可识别的指令(G代码)。这些指令通过设定挤出机路径及流量速率来指导打印。要实现机器人3D打印,需将RoboDK与切片软件配合使用。
Tip:右键单击 RoboDK 中的物体,将其保存为 STL。
●在菜单栏选择实用程序➔ 3D 打印项目,打开3D 打印设置。

Note:这些设置与机器人加工项目相同,唯一不同的是路径输入预设为3D打印对象。点击选择对象,在主屏幕上选择物体并自动获取刀具路径。选择 3D 打印选项,打开 Slic3r。
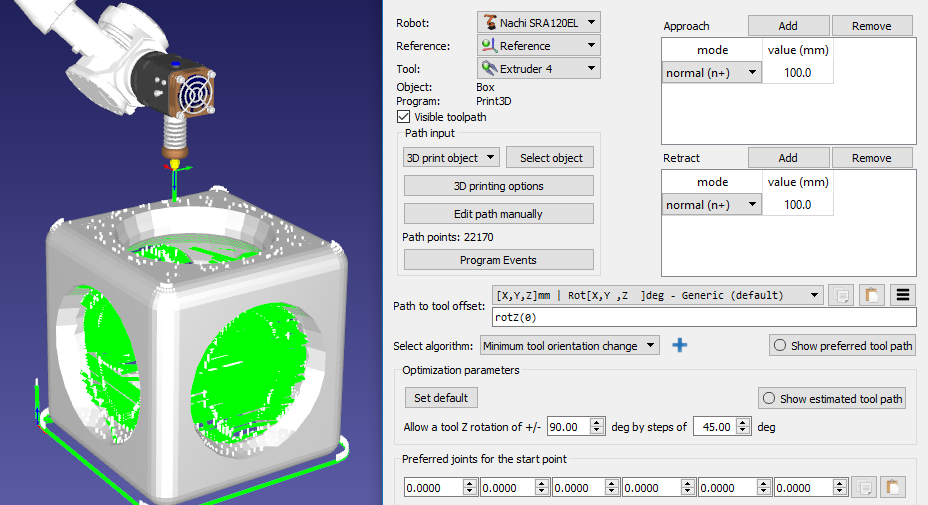
Important:选择3D打印物体选项时,可默认使用切片器Slic3r将物体转换为刀具路径。或者也可以通过生成 G 代码程序并将其转换为机器人加工项目程序来使用其他切片器,如图所示。
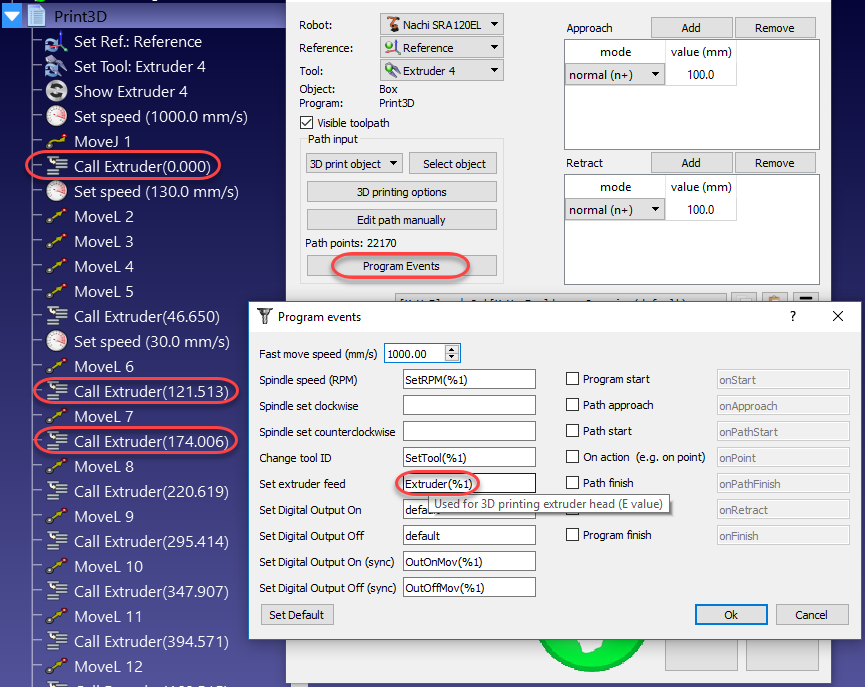
默认情况下,RoboDK 将E指令位移为对名为Extruder的程序的程序调用,并将 E 值作为参数传递。选择程序事件可更改这一行为。
挤出机值 (E) 表示每次移动前需要挤出多少材料。考虑到机器人的速度和各点之间的距离,该值可用于驱动机器人的挤出机进料。
另外,也可以使用后处理器计算挤出机进料,并相应生成适当的代码。下文将提供一个范例。
Note:某些机器人控制器可使机器人运动与挤出机进给自动同步。在这种情况下,你需要在后处理器中将挤出机设置为外轴。
3D 打印后处理器
本节介绍如何修改机器人后处理器,以便在执行3D 打印的运动指令前计算挤出机速度。另外,也可以在机器人控制器上通过挤出机程序调用(驱动挤出机的默认指令)进行这些操作。
通过自定义机器人后处理器,可以在将程序发送至机器人之前,更轻松地集成3D打印挤出机。为实现这一目标,我们需要在机器人后置处理器生成程序时进行相关计算并输出定制化代码。
Note:部分后处理器(如ABB RAPID IRC5、KUKA KRC2和Comau后处理器)默认已实现这些建议的修改。
第一步是拦截挤出机调用,并在后处理器的RunCode部分读取新的挤出机值(E值)。以下部分处理为程序生成的所有程序调用:
def RunCode(self, code, is_function_call = False):
if is_function_call:
if code.startswith("Extruder("):
# Intercept the extruder command.
# if the program call is Extruder(123.56)
# we extract the number as a string
# and convert it to a number
self.PRINT_E_NEW = float(code[9:-1])
# Skip the program call generation
return
else:
self.addline(code + "()")
else:
# Output program code
self.addline(code)
挤出机数值(长度/E)在机器人后处理器中被保存为PRINT_E_NEW变量。
我们需要在每个新的线性运动指令处触发名为new_move的函数调用。可以在MoveL命令的开头添加这个调用:
def MoveL(self, pose, joints, conf_RLF=None):
"""Add a linear movement"""
# Handle 3D printing Extruder integration
self.new_move(pose)
...
我们还必须在后处理器的文件头部添加以下变量以计算挤出机增量:
# 3D Printing Extruder Setup Parameters:
PRINT_E_AO = 5 # Analog Output ID to command the extruder flow
PRINT_SPEED_2_SIGNAL = 0.10 # Ratio to convert the speed/flow to an analog output signal
PRINT_FLOW_MAX_SIGNAL = 24 # Maximum signal to provide to the Extruder
PRINT_ACCEL_MMSS = -1 # Acceleration, -1 assumes constant speed if we use rounding/blending
# Internal 3D Printing Parameters
PRINT_POSE_LAST = None # Last pose printed
PRINT_E_LAST = 0 # Last Extruder length
PRINT_E_NEW = None # New Extruder Length
PRINT_LAST_SIGNAL = None # Last extruder signal
最后,我们需要定义一个新的程序,该程序将根据运动间距、机器人速度和机器人加速度生成适当的挤出机进给指令。这需要假设挤出机进给是由特定的模拟输出或自定义程序调用驱动的。
我们需要在 def MoveL 程序定义前添加以下代码。
Important:在RoboDK中为机器人编程时使用四舍五入值有助于保持恒定速度并减少加速度行为的影响。此时,时间可按距离/速度计算得出。
def calculate_time(self, distance, Vmax, Amax=-1):
"""Calculate the time to move a distance with Amax acceleration and Vmax speed"""
if Amax < 0:
# Assume constant speed (appropriate smoothing/rounding parameter must be set)
Ttot = distance/Vmax
else:
# Assume we accelerate and decelerate
tacc = Vmax/Amax;
Xacc = 0.5*Amax*tacc*tacc;
if distance <= 2*Xacc:
# Vmax is not reached
tacc = sqrt(distance/Amax)
Ttot = tacc*2
else:
# Vmax is reached
Xvmax = distance - 2*Xacc
Tvmax = Xvmax/Vmax
Ttot = 2*tacc + Tvmax
return Ttot
def new_move(self, new_pose):
"""Implement the action on the extruder for 3D printing, if applicable"""
if self.PRINT_E_NEW isNone or new_pose is None:
return
# Skip the first move and remember the pose
if self.PRINT_POSE_LAST isNone:
self.PRINT_POSE_LAST = new_pose
return
# Calculate the increase of material for the next movement
add_material = self.PRINT_E_NEW - self.PRINT_E_LAST
self.PRINT_E_LAST = self.PRINT_E_NEW
# Calculate the robot speed and Extruder signal
extruder_signal = 0
if add_material > 0:
distance_mm = norm(subs3(self.PRINT_POSE_LAST.Pos(), new_pose.Pos()))
# Calculate movement time in seconds
time_s = self.calculate_time(distance_mm, self.SPEED_MMS, self.PRINT_ACCEL_MMSS)
# Avoid division by 0
if time_s > 0:
# This may look redundant but it allows you to account for accelerations and we can apply small speed adjustments
speed_mms = distance_mm / time_s
# Calculate the extruder speed in RPM*Ratio (PRINT_SPEED_2_SIGNAL)
extruder_signal = speed_mms * self.PRINT_SPEED_2_SIGNAL
# Make sure the signal is within the accepted values
extruder_signal = max(0,min(self.PRINT_FLOW_MAX_SIGNAL, extruder_signal))
# Update the extruder speed when required
if self.PRINT_LAST_SIGNAL isNone or abs(extruder_signal - self.PRINT_LAST_SIGNAL) > 1e-6:
self.PRINT_LAST_SIGNAL = extruder_signal
# Use the built-in setDO function to set an analog output
self.setDO(self.PRINT_E_AO, "%.3f" % extruder_signal)
# Alternatively, provoke a program call and handle the integration with the robot controller
#self.addline('ExtruderSpeed(%.3f)' % extruder_signal)
# Remember the last pose
self.PRINT_POSE_LAST = new_pose